 软件奇技淫巧
# 1.Vscode
# 1.推荐插件
| 插件名字 | 作用 |
|---|---|
| Bracket Pair Colorizer | 括号颜色 |
| C/C++ for Visual Studio Code | C/C++文件配置 |
| Code Spell Checker | 代码检查 |
| koroFileHeader | 增加文件头部注释&函数头部注释 |
| TODO Highlight | TODO高亮 |
| vscode-icons | 文件图标 |
# 2.koroFileHeader
    "fileheader.customMade": {
        "Description":"",
        "Author":"Wangzhe",
        "Date":"",
        "LastEditors":"Wangzhe",
        "LastEditTime":"",
        "FilePath":""
    },
2
3
4
5
6
7
8
# 2.字体设置
参考这里 : https://github.com/tonsky/FiraCode/wiki/VS-Code-Instructions
1.下载
https://github.com/tonsky/FiraCode
2.安装ttf
3.vscode配置
在settings.json中添加如下配置
{
	"editor.fontLigatures": true,
    "editor.fontFamily": "Fira Code",
    "editor.fontWeight": "400" // Medium
}
2
3
4
5
# 3.编译参数修改
# 场景需求1:已知main函数里面引入了schedule.h,利用vscode 如何 既编译main.c,又编译schedule.c
解决方案如下:
首先考虑 其实真正的指令应该如右所示:gcc main.c schedule.c -o main
所以只需要在tasks.json中对C语言编译配置中加上 schedule即可,如下:
{
			"type": "shell",
			"label": "C: gcc.exe build active file",
			"command": "D:\\1_softwares\\0_workspace\\mingw64\\bin\\gcc.exe",
			"args": [
				"-g",
				"${file}",
				"${fileDirname}/scheduler.c", # 记得加上文件路径
				"-o",
				"${fileDirname}\\${fileBasenameNoExtension}.exe"
			],
			"options": {
				"cwd": "${workspaceFolder}"
			},
			"problemMatcher": [
				"$gcc"
			],
			"group": "build"
		},
2
3
4
5
6
7
8
9
10
11
12
13
14
15
16
17
18
19
# 场景需求2:想运行指令 main.exe args
解决方案:这种场景很多,因为我们在运行某个程序时,要引入输入文件,或者其他参数等等
只需要在launch.json中的args属性修改下即可
{
            "name": "gcc.exe - 生成和调试活动文件",
            "type": "cppdbg",
            "request": "launch",
            "program": "${fileDirname}\\${fileBasenameNoExtension}.exe",
            "args": ["${fileDirname}\\uf2_8latiir.g"], # 修改这里,别忘记路径
            "stopAtEntry": false,
            "cwd": "${workspaceFolder}",
            "environment": [],
            "externalConsole": false,
            "MIMode": "gdb",
            "miDebuggerPath": "D:\\1_softwares\\0_workspace\\mingw64\\bin\\gdb.exe",
            "setupCommands": [
                {
                    "description": "为 gdb 启用整齐打印",
                    "text": "-enable-pretty-printing",
                    "ignoreFailures": true
                }
            ],
            "preLaunchTask": "C: gcc.exe build active file"
        }
2
3
4
5
6
7
8
9
10
11
12
13
14
15
16
17
18
19
20
21
# 2.VMware
# 1.配置KVM
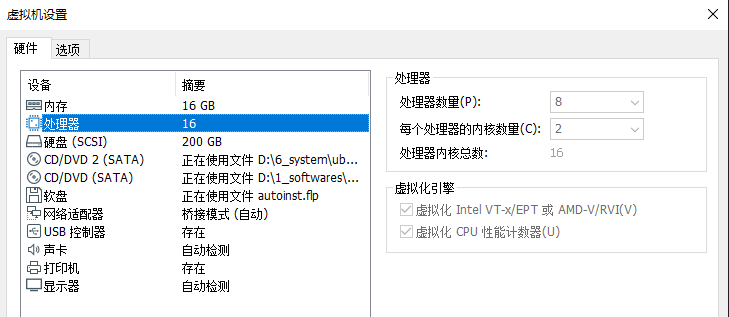
首先在虚拟机的设置里面勾选虚拟化选项

(1)安装 Qemu-KVM 和 cpu-checker
sudo apt-get install qemu-kvm cpu-checker
(2)查看系统 KVM 是否可用
$ kvm-ok
  INFO: /dev/kvm exists
  KVM acceleration can be used
2
3
(3)创建 kvm 用户组并把当前登录用户(如 king )添加到 kvm 用户组
sudo addgroup kvm
sudo usermod -a -G kvm king
2
(4)改变 /dev/kvm 用户组为 kvm
sudo chgrp kvm /dev/kvm
(5)创建 udev rule,并写入 KERNEL=="kvm", GROUP="kvm", MODE="0660"
sudo gedit /etc/udev/rules.d/60-qemu-kvm.rules
KERNEL=="kvm", GROUP="kvm", MODE="0660"
2
(6)重启在运行 emulator
# 3.Typora
# 1.实现内部跳转
https://support.typora.io/Links/#faq
# Internal Links
You can use # to create links towards any headings in your markdown file, for example:
# This is a title

...
...
...


A [link](#this-is-a-title) to jump towards target header
2
3
4
5
6
7
8
You could also write named anchors using raw HTML:
<a name="anchor"></a> Anchor

<a href="#anchor">Link to Anchor</a>
2
3
To, hide the empty <a>, you could add following in custom CSS (#2921 (opens new window)):
/* hide the anchor HTML */
a[name]:empty + .md-raw-inline {
  display:none;
}
a[name]:empty {
  text-decoration: none;
}
a[name]:empty:before {
 content:"⚓";
}
/* show the anchor HTML when cursor is inside */
.md-expand .md-raw-inline {
    display: inline !important;
}
2
3
4
5
6
7
8
9
10
11
12
13
14
# Open Links in Typora
You can use command+click (macOS), or ctrl+click (Linux/Windows) on links in Typora to jump to target headings, or open them in Typora, or open in related apps.
# 2.引入静态图片
# 引用
![avatar][base64str]

# 定义在下面
[base64str]:data:image/png;base64,iVBORw0......
2
3
4
5
图片转base64链接:http://tool.chinaz.com/tools/imgtobase/
# 5.PM3
# 1. 常用类
help 	显示帮助.
hw help 与 hw 是等价的。
data 	图形窗口/缓冲区数据操作等等
exit 	退出Proxmark3的终端环境
hf 	高频相关命令
hw 	硬件检测相关命令
lf 	低频相关命令
quit 	退出Proxmark3的终端环境等同exit

hw tune 显示天线调谐
hw ver  显示硬件(固件)版本
2
3
4
5
6
7
8
9
10
11
# 2. low Frequency 低频类(LF)
lf 低频相关命令
help 	显示帮助
cmdread 	<off> <'0'> <'1'> <命令> ['h'] -- 在读取之前发送命令来调整LF读卡器周期(以微妙为单位)('h'选项为134)
em4x 	EM4X卡类相关命令...
flexdemod 	解调FlexPass样本
hid 	HID卡类相关命令...
indalademod 	['224'] --解调Indala样本的64位UID(选项'224'是224位)
indalaclone 	[UID] ['l']-- 克隆Indala到T55x7卡 (标签必须在天线上)(UID为16进制)(选项'l'表示224位UID)
read 	['h'] -- 读取125/134 kHz的低频ID标签(选项'h'是134)
sim 	[GAP] -- 从可选GAP的缓冲区模拟低频标签(以微秒为单位)
simbidir 	模拟低频标签(在读卡器和标签之间双向传输数据)
simman 	<时钟> <比特率> [GAP] 模拟任意曼彻斯特低频标签
ti 	TI卡类相关命令...
hitag 	Hitag标签与应答相关…
vchdemod 	['clone'] - 解调VeriChip公司样本
t55xx 	T55xx卡类相关命令...
PCF7931 	PCF7931卡类相关命令...
2
3
4
5
6
7
8
9
10
11
12
13
14
15
16
17
# 3. High Frequency 高频类(HF)
hf 高频相关命令
help 	显示帮助
14a 	ISO14443A卡的相关命令...
14b 	ISO14443B卡的相关命令...
15 	ISO15693卡的相关命令...
epa 	德国身份证的相关命令...
legic 	LEGIC卡的相关命令...
iclass 	ICLASS卡的相关命令...
mf 	MIFARE卡的相关命令...
tune 	连续测量高频天线的调谐
2
3
4
5
6
7
8
9
10
# 3.1 hf 14a 【ISO14443A卡的相关命令】
hf 14a help 	显示帮助
hf 14a list 	列出窃听到的ISO14443A类卡与读卡器的通信历史记录
hf 14a reader 	读取ISO14443A类卡的UID等数据
hf 14a cuids 	收集指定数目的随机UID,显示开始和结束时间。
hf 14a sim 	<UID> -- 模拟ISO14443A类标签
hf 14a snoop 	窃听ISO14443A类卡与读卡器的通信数据
hf 14a raw 	使用RAW格式命令发送指令到标签
2
3
4
5
6
7
# 3.2 hf 14b 【ISO14443B卡的相关命令】
hf 14b help 	显示帮助
hf 14b demod 	调制ISO14443B协议的标签
hf 14b list 	列出窃听到的ISO14443B类卡与读卡器通信历史记录
hf 14b read 	读取ISO14443B类卡的信息
hf 14b sim 	模拟ISO14443B类标签
hf 14b simlisten 	从高频样本中模拟ISO14443B类标签
hf 14b snoop 	监听ISO14443B类卡与读卡器之间的通信数据
hf 14b sri512read 	<int> -- 读取SRI512标签的内容
hf 14b srix4kread 	<int> -- 读取SRIX4K标签的内容
hf 14b raw 	使用RAW格式命令发送指令到标签
2
3
4
5
6
7
8
9
10
# 3.3 hf 15 【ISO15693卡的相关命令】
hf 15 (ISO15693卡的相关命令...)
hf 15 help 	显示帮助
hf 15 demod 	调制ISO15693协议的标签
hf 15 read 	读取ISO15693类卡的信息
hf 15 record 	记录ISO15693标签样本
hf 15 reader 	作为ISO15693卡类的读卡器,读取UID等信息
hf 15 sim 	模拟ISO15693协议的标签
hf 15 cmd 	向ISO15693协议的标签直接发送命令
hf 15 findafi 	暴力一个ISO15693标签的AFI
hf 15 dumpmemory 	读取ISO15693标签的所有页内存数据
2
3
4
5
6
7
8
9
10
# 3.4 hf iclass 【ICLASS卡的相关命令】
hf iclass help 	显示帮助
hf iclass list 	列出窃听到的iClass类卡与读卡器的通信历史记录
hf iclass snoop 	窃听iClass类卡与读卡器的通信数据
hf iclass sim 	模拟iClass标签
hf iclass reader 	读取iClass标签
2
3
4
5
# 3.5 hf mf 【MIFARE卡的相关命令】
hf mf help 	显示帮助
hf mf dbg 	设置默认调试模式
hf mf rdbl 	读取MIFARE classic卡的区块数据
hf mf rdsc 	读取MIFARE classic卡的扇区数据
hf mf dump 	导出MIFARE classic卡的数据到二进制文件
hf mf restore 	从二进制文件恢复数据到空白的MIFARE classic卡
hf mf wrbl 	改写MIFARE classic卡的区块数据
hf mf chk 	测试MIFARE classic卡的各个区块KEY A/B
hf mf mifare 	基于PRNG漏洞,执行mifare “DarkSide”攻击操作
hf mf nested 	测试嵌套认证漏洞,基于一个已知Key,获取都有扇区Keys
hf mf sniff 	嗅卡片与读写器之间的通讯(等同于hf 14a snoop)
hf mf sim 	模拟一个MIFARE卡片
hf mf eclr 	清除仿真内存的各区块数据
hf mf eget 	获取仿真内存的各区块数据
hf mf eset 	设置仿真内存的各区块数据
hf mf eload 	从导出的文件加载仿真数据
hf mf esave 	导出保存仿真数据到文件
hf mf ecfill 	利用仿真器的keys来填补仿真内存
hf mf ekeyprn 	打印输出仿真内存中的keys
hf mf csetuid 	直接设置可改UID卡的UID
hf mf csetblk 	把对应区块数据写入UID卡
hf mf cgetblk 	读取UID卡对应区块数据
hf mf cgetsc 	读取UID卡对应扇区数据
hf mf cload 	写入dump数据到UID卡。注意
hf mf csave 	保存UID卡数据到文件或者仿真内存
2
3
4
5
6
7
8
9
10
11
12
13
14
15
16
17
18
19
20
21
22
23
24
25
